|
上一篇:Android 天气APP(四)搭建MVP框架与使用
天气预报、生活指数的数据请求与渲染
新版-------------------一、增加天气接口地址二、增加API接口三、天气数据存储库四、获取实时天气数据五、全屏沉浸式六、文章源码
旧版-------------------6. 天气预报① 新增API接口② 修改订阅器③ 修改布局,增加列表和适配器④ 使用适配器进行数据展示
7. 生活指数① 新增API接口② 修改订阅器③ 修改布局④ 数据渲染显示
新版-------------------
在上一篇文章中,我们通过网络框架请求和风的搜索城市API接口拿到了当前所定位的城市的城市ID,那么通过这个城市ID,我们可以去获取城市的天气状况了。
一、增加天气接口地址
首先我们看一下实时天气的接口。
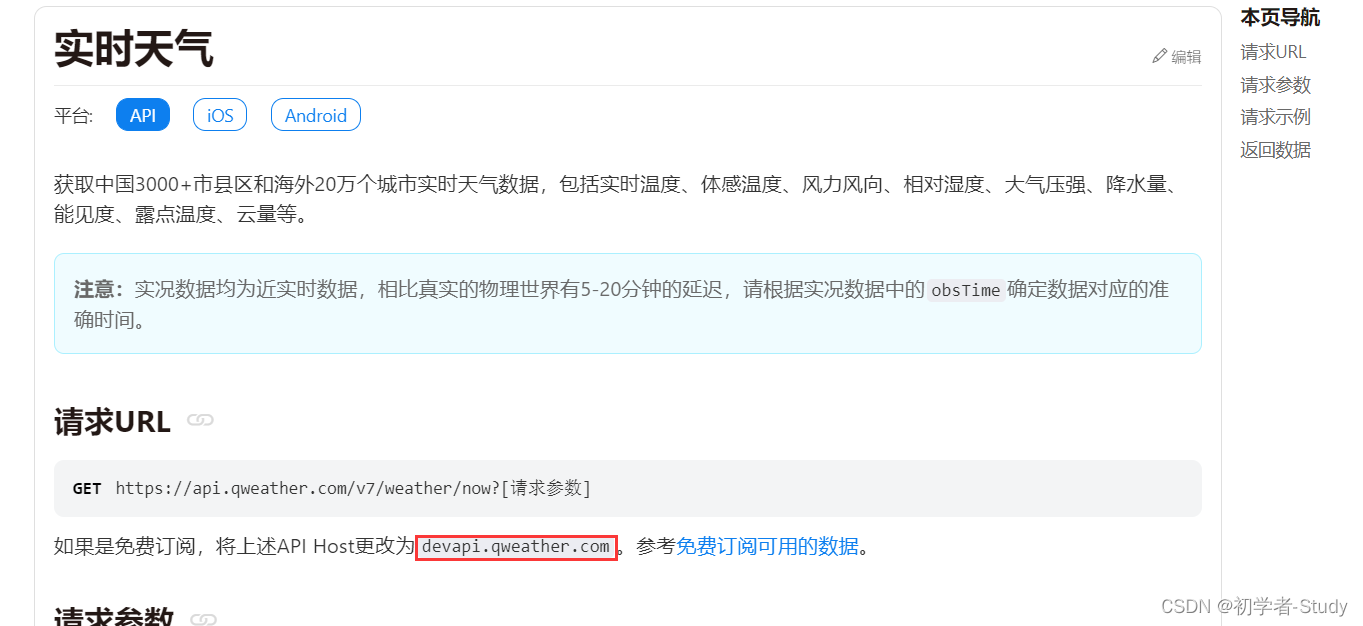
这里我们看到请求的地址和之前的搜索城市不同,所以我们需要在请求网络的时候修改不同的API地址头,那么首先我们在library包下的ApiType枚举类中增加一个API类型,代码如下:
public enum ApiType {
SEARCH, //和风 城市搜索
WEATHER, //和风 天气接口
}
这里增加了一个天气接口,下面我们修改一下NetworkApi类中的getBaseUrl(),代码如下:
private static void getBaseUrl(ApiType apiType) {
switch (apiType) {
case SEARCH:
mBaseUrl = "https://geoapi.qweather.com";//和风天气搜索城市
break;
case WEATHER:
mBaseUrl = "https://devapi.qweather.com";//和风天气API
default:
break;
}
}
这里我增加了一个case,用于判断接口传进来的Api类型,从而设置不同的地址头,因为每一个接口都需要有成功和失败的请求回调,那么我们修改一下BaseViewModel中的failed变量的作用域为public,代码如下:
public class BaseViewModel extends ViewModel {
public MutableLiveData failed = new MutableLiveData();
}
之前是protected。
二、增加API接口
下面我们需要增加一个实时天气的API接口,那么在增加接口之前首先要知道这个接口请求之后返回什么数据,可以看文档中的这里。
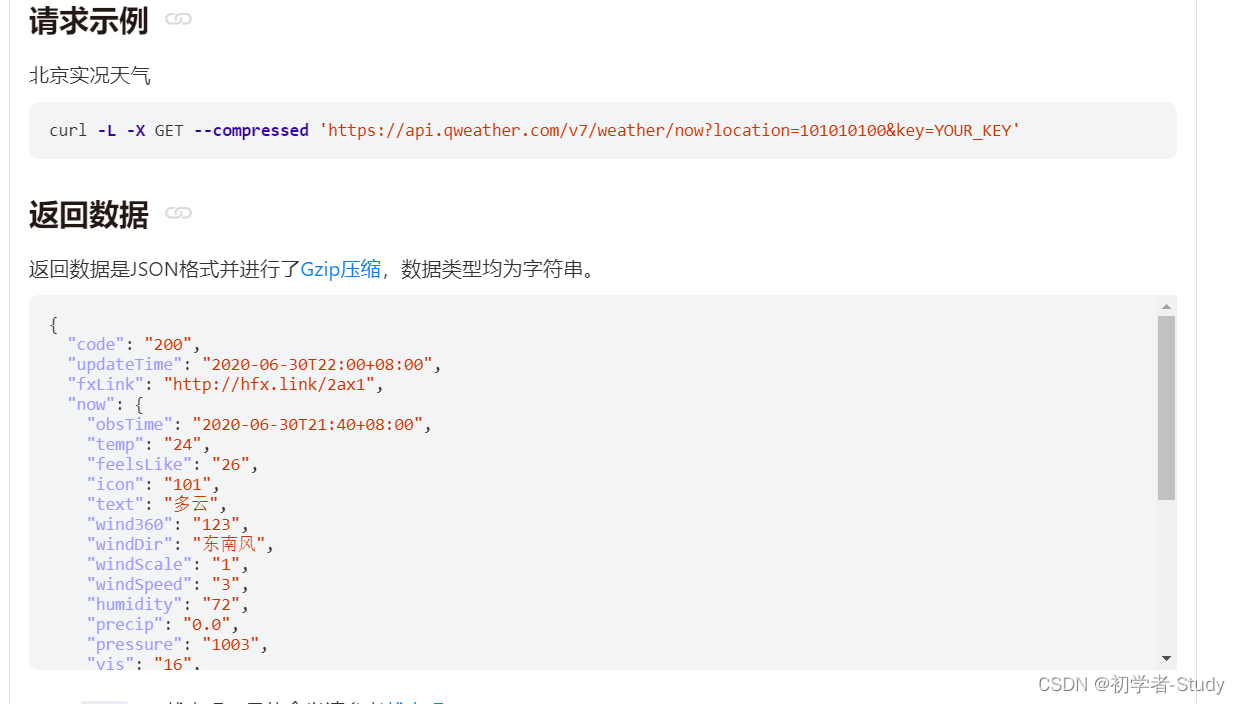
根据这里返回的示例JSON数据,我们可以手写一个数据实体类,在app模块的bean包下新建NowResponse类,代码如下所示:
public class NowResponse {
private String code;
private String updateTime;
private String fxLink;
private NowBean now;
private ReferBean refer;
public String getCode() {
return code;
}
public void setCode(String code) {
this.code = code;
}
public String getUpdateTime() {
return updateTime;
}
public void setUpdateTime(String updateTime) {
this.updateTime = updateTime;
}
public String getFxLink() {
return fxLink;
}
public void setFxLink(String fxLink) {
this.fxLink = fxLink;
}
public NowBean getNow() {
return now;
}
public void setNow(NowBean now) {
this.now = now;
}
public ReferBean getRefer() {
return refer;
}
public void setRefer(ReferBean refer) {
this.refer = refer;
}
public static class NowBean {
private String obsTime;
private String temp;
private String feelsLike;
private String icon;
private String text;
private String wind360;
private String windDir;
private String windScale;
private String windSpeed;
private String humidity;
private String precip;
private String pressure;
private String vis;
private String cloud;
private String dew;
public String getObsTime() {
return obsTime;
}
public void setObsTime(String obsTime) {
this.obsTime = obsTime;
}
public String getTemp() {
return temp;
}
public void setTemp(String temp) {
this.temp = temp;
}
public String getFeelsLike() {
return feelsLike;
}
public void setFeelsLike(String feelsLike) {
this.feelsLike = feelsLike;
}
public String getIcon() {
return icon;
}
public void setIcon(String icon) {
this.icon = icon;
}
public String getText() {
return text;
}
public void setText(String text) {
this.text = text;
}
public String getWind360() {
return wind360;
}
public void setWind360(String wind360) {
this.wind360 = wind360;
}
public String getWindDir() {
return windDir;
}
public void setWindDir(String windDir) {
this.windDir = windDir;
}
public String getWindScale() {
return windScale;
}
public void setWindScale(String windScale) {
this.windScale = windScale;
}
public String getWindSpeed() {
return windSpeed;
}
public void setWindSpeed(String windSpeed) {
this.windSpeed = windSpeed;
}
public String getHumidity() {
return humidity;
}
public void setHumidity(String humidity) {
this.humidity = humidity;
}
public String getPrecip() {
return precip;
}
public void setPrecip(String precip) {
this.precip = precip;
}
public String getPressure() {
return pressure;
}
public void setPressure(String pressure) {
this.pressure = pressure;
}
public String getVis() {
return vis;
}
public void setVis(String vis) {
this.vis = vis;
}
public String getCloud() {
return cloud;
}
public void setCloud(String cloud) {
this.cloud = cloud;
}
public String getDew() {
return dew;
}
public void setDew(String dew) {
this.dew = dew;
}
}
public static class ReferBean {
private List sources;
private List license;
public List getSources() {
return sources;
}
public void setSources(List sources) {
this.sources = sources;
}
public List getLicense() {
return license;
}
public void setLicense(List license) {
this.license = license;
}
}
}
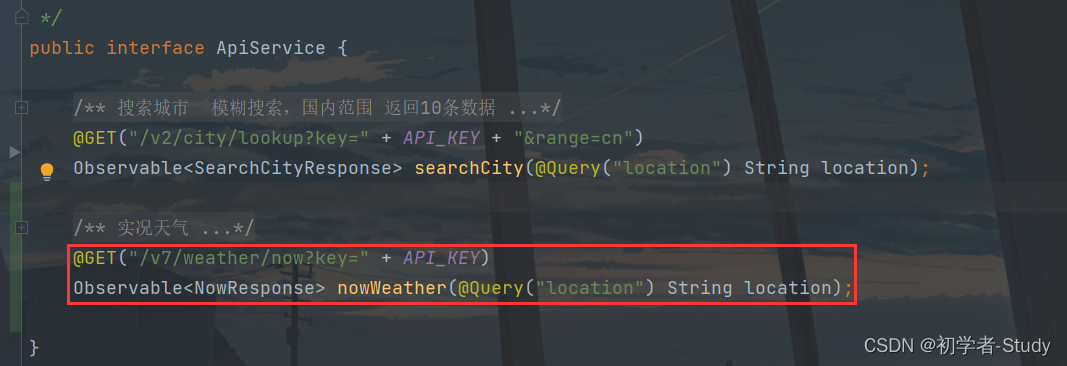
有了实体类,我们就可以去ApiService中增加接口代码了,代码如下所示:
@GET("/v7/weather/now?key=" + API_KEY)
Observable nowWeather(@Query("location") String location);
添加位置如下图所示:
三、天气数据存储库
下面我们应该写一个方法调用这个接口去请求网络,还记得上一篇文章中写到的搜索城市存储类SearchCityRepository吗?那么相应的我们可以在repository包下新增一个WeatherRepository类,里面可以写上所有和天气相关的接口请求方法,代码如下:
@SuppressLint("CheckResult")
public class WeatherRepository {
private static final String TAG = WeatherRepository.class.getSimpleName();
/**
* 实况天气
*
* @param responseLiveData 成功数据
* @param failed 错误信息
* @param cityId 城市ID
*/
public void nowWeather(MutableLiveData responseLiveData,
MutableLiveData failed, String cityId) {
String type = "实时天气-->";
NetworkApi.createService(ApiService.class, ApiType.WEATHER).nowWeather(cityId)
.compose(NetworkApi.applySchedulers(new BaseObserver() {
@Override
public void onSuccess(NowResponse nowResponse) {
if (nowResponse == null) {
failed.postValue("实况天气数据为null,请检查城市ID是否正确。");
return;
}
//请求接口成功返回数据,失败返回状态码
if (Constant.SUCCESS.equals(nowResponse.getCode())) {
responseLiveData.postValue(nowResponse);
} else {
failed.postValue(type + nowResponse.getCode());
}
}
@Override
public void onFailure(Throwable e) {
Log.e(TAG, "onFailure: " + e.getMessage());
failed.postValue(type + e.getMessage());
}
}));
}
}
这里的代码我相信你可以看得懂,就是请求接口拿到返回的数据再通过LiveData传递出去,这里我在请求失败的时候加了一个type,这样我们就可以很清楚的知道是那个接口有问题,那么同样需要修改一下SearchCityRepository类中searchCity()方法,这个就自己去修改吧,依葫芦画瓢就行。
下面我们就需要在ViewModel中去调用刚才所写的nowWeather()方法,因为都是在MainActivity中请求数据,那么理应将代码写在MainViewModel中,在MainViewModel中增加如下代码:
public MutableLiveData nowResponseMutableLiveData = new MutableLiveData();
public void nowWeather(String cityId) {
new WeatherRepository().nowWeather(nowResponseMutableLiveData,failed, cityId);
}
现在一切准备就绪了,下面我们应该做什么了?应该请求数据然后显示在页面上了。
四、获取实时天气数据
而要显示在页面上,我们首先需要修改一下activity_main.xml中的内容,毕竟它里面当前只有一个TextView,这可还不够啊,修改代码如下:
这里面可能你会报错,因为你少了两个内容,一个是背景图main_bg,另一个是资源文件,里面我放置了一些文字和尺寸的值,在values下新建一个dimens.xml文件,里面代码如下所示:
10sp
12sp
14sp
16sp
18sp
20sp
24sp
60sp
1dp
2dp
4dp
6dp
8dp
12dp
16dp
24dp
32dp
现在你应该只有那个背景图报错了,你可以自己弄一个进去,也可以在我的源码中拿,就放在drawable-nodpi文件夹下,你需要创建这个文件夹,如下图所示:

现在假设你的xml已经不报错了,我们看一下预览效果图。
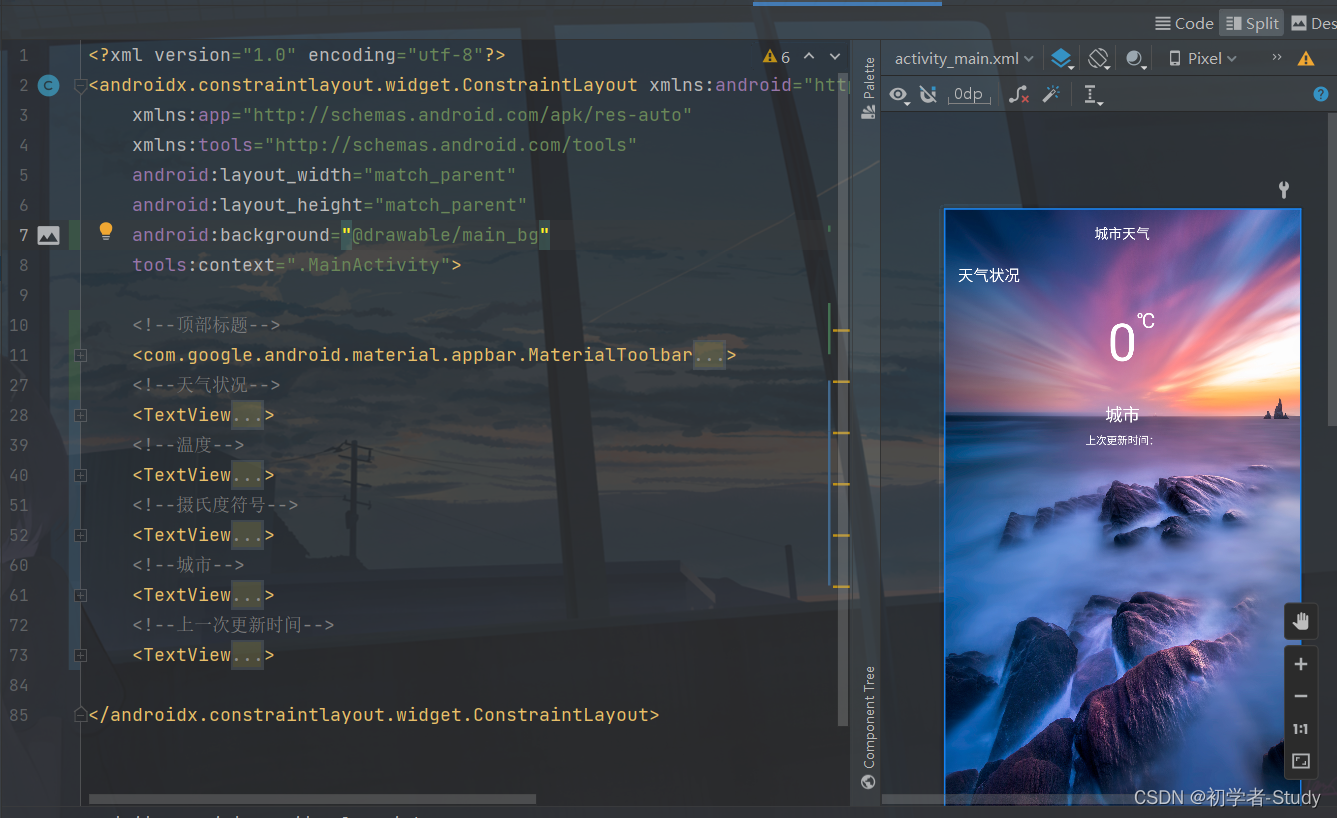
相比于之前我使用了很多布局嵌套,现在通过ConstraintLayout进行布局,就显得代码量很少简洁,所以如果你还不会使用ConstraintLayout,一定要去学习一下。
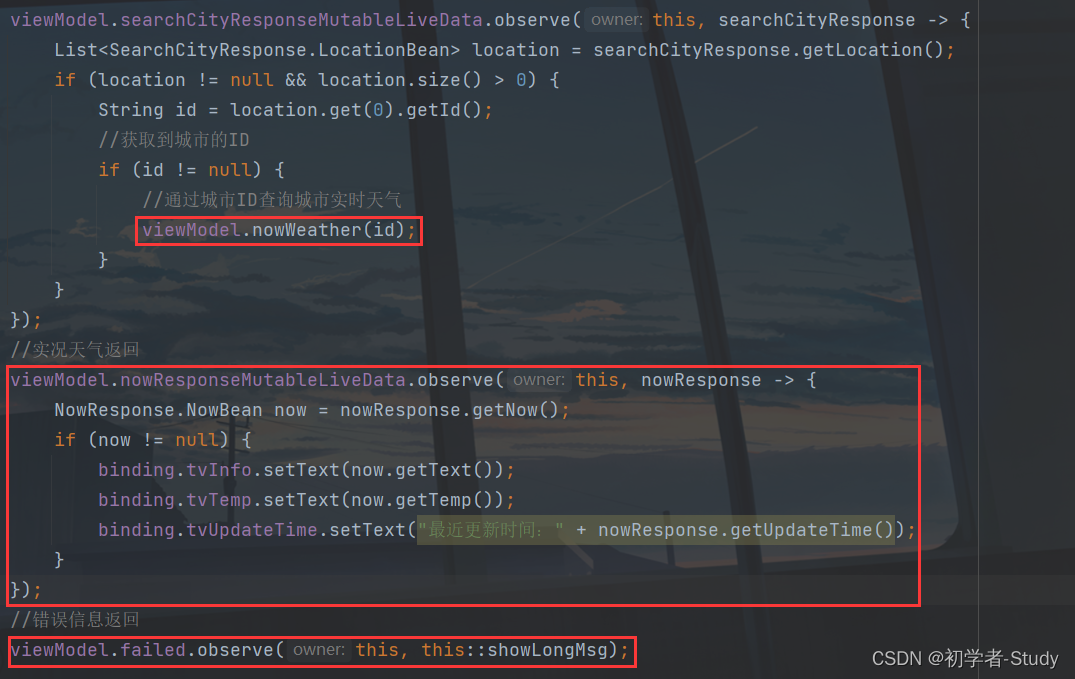
好了,下面我们在MainActivity中使用实时天气请求数据,修改一下onObserveData()方法中的代码,如下所示:
@Override
protected void onObserveData() {
if (viewModel != null) {
//城市数据返回
viewModel.searchCityResponseMutableLiveData.observe(this, searchCityResponse -> {
List location = searchCityResponse.getLocation();
if (location != null && location.size() > 0) {
String id = location.get(0).getId();
//获取到城市的ID
if (id != null) {
//通过城市ID查询城市实时天气
viewModel.nowWeather(id);
}
}
});
//实况天气返回
viewModel.nowResponseMutableLiveData.observe(this, nowResponse -> {
NowResponse.NowBean now = nowResponse.getNow();
if (now != null) {
binding.tvInfo.setText(now.getText());
binding.tvTemp.setText(now.getTemp());
binding.tvUpdateTime.setText("最近更新时间:" + nowResponse.getUpdateTime());
}
});
//错误信息返回
viewModel.failed.observe(this, this::showLongMsg);
}
}
新增的代码就是这三个地方
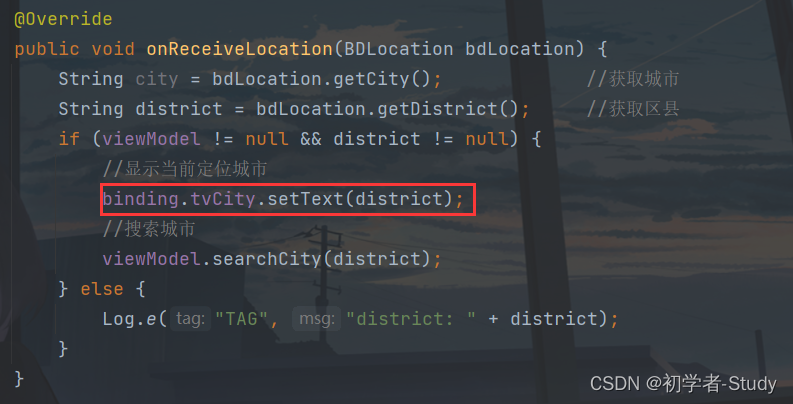
最后我们在onReceiveLocation()方法中去掉之前没有用到的代码,然后设置一下当前所处的城市,如下图所示:
下面运行一下:

OK,就是这样。
五、全屏沉浸式
这里数据确实显示出来了,但是我们注意到屏幕的顶部和底部分别有一些突兀,看起来不是很协调,我们需要让它看起来协调,可以这么做,首先我们修改一下res下的values下的themes.xml和values-night下的theme.xml中的代码:
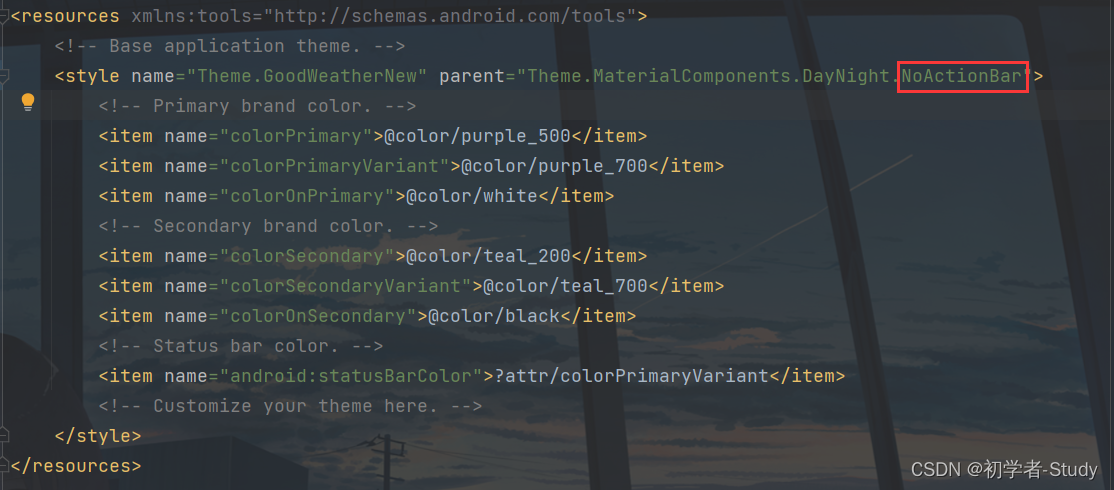
主要改动去掉默认的ActionBar,然后我们在BaseActivity中新增一个方法,用于设置全屏沉浸式,代码如下:
protected void setFullScreenImmersion() {
Window window = getWindow();
window.clearFlags(WindowManager.LayoutParams.FLAG_TRANSLUCENT_STATUS);
window.addFlags(WindowManager.LayoutParams.FLAG_DRAWS_SYSTEM_BAR_BACKGROUNDS);
int option = window.getDecorView().getSystemUiVisibility() | View.SYSTEM_UI_FLAG_LAYOUT_STABLE |
View.SYSTEM_UI_FLAG_LAYOUT_FULLSCREEN | View.SYSTEM_UI_FLAG_LAYOUT_HIDE_NAVIGATION;
window.getDecorView().setSystemUiVisibility(option);
window.setStatusBarColor(Color.TRANSPARENT);
window.setNavigationBarColor(Color.TRANSPARENT);
}
然后在MainActivity的onCreate()方法中调用。

下面重新运行一下:

本篇文章就到这里。
六、文章源码
欢迎 Star 和 Fork
第五篇文章源码地址:GoodWeather-New-5
旧版-------------------
6. 天气预报
天气预报是预测未来几天的天气,常用列表显示,实现这个功能的业务逻辑是:访问API、获取返回值、列表配置、数据渲染。首先是API接口。
① 新增API接口
根据和风天气中的文档,得知未来3-7天的天气预报接口为:
https://free-api.heweather.net/s6/weather/forecast?key=3086e91d66c04ce588a7f538f917c7f4&location=福田区
在网页上访问得到返回值,生成一个实体  代码如下: 代码如下:
package com.llw.goodweather.bean;
import java.util.List;
public class WeatherForecastResponse {
private List HeWeather6;
public List getHeWeather6() {
return HeWeather6;
}
public void setHeWeather6(List HeWeather6) {
this.HeWeather6 = HeWeather6;
}
public static class HeWeather6Bean {
/**
* basic : {"cid":"CN101280603","location":"福田","parent_city":"深圳","admin_area":"广东","cnty":"中国","lat":"22.5410099","lon":"114.05095673","tz":"+8.00"}
* update : {"loc":"2019-11-19 19:57","utc":"2019-11-19 11:57"}
* status : ok
* daily_forecast : [{"cond_code_d":"100","cond_code_n":"101","cond_txt_d":"晴","cond_txt_n":"多云","date":"2019-11-19","hum":"50","mr":"23:52","ms":"12:27","pcpn":"0.0","pop":"20","pres":"1012","sr":"06:39","ss":"17:38","tmp_max":"22","tmp_min":"16","uv_index":"5","vis":"25","wind_deg":"31","wind_dir":"东北风","wind_sc":"3-4","wind_spd":"17"},{"cond_code_d":"101","cond_code_n":"101","cond_txt_d":"多云","cond_txt_n":"多云","date":"2019-11-20","hum":"67","mr":"00:00","ms":"13:14","pcpn":"0.0","pop":"3","pres":"1011","sr":"06:40","ss":"17:38","tmp_max":"24","tmp_min":"16","uv_index":"4","vis":"25","wind_deg":"-1","wind_dir":"无持续风向","wind_sc":"1-2","wind_spd":"5"},{"cond_code_d":"101","cond_code_n":"101","cond_txt_d":"多云","cond_txt_n":"多云","date":"2019-11-21","hum":"73","mr":"00:54","ms":"13:57","pcpn":"0.0","pop":"2","pres":"1009","sr":"06:40","ss":"17:38","tmp_max":"26","tmp_min":"19","uv_index":"3","vis":"25","wind_deg":"-1","wind_dir":"无持续风向","wind_sc":"1-2","wind_spd":"2"}]
*/
private BasicBean basic;
private UpdateBean update;
private String status;
private List daily_forecast;
public BasicBean getBasic() {
return basic;
}
public void setBasic(BasicBean basic) {
this.basic = basic;
}
public UpdateBean getUpdate() {
return update;
}
public void setUpdate(UpdateBean update) {
this.update = update;
}
public String getStatus() {
return status;
}
public void setStatus(String status) {
this.status = status;
}
public List getDaily_forecast() {
return daily_forecast;
}
public void setDaily_forecast(List daily_forecast) {
this.daily_forecast = daily_forecast;
}
public static class BasicBean {
/**
* cid : CN101280603
* location : 福田
* parent_city : 深圳
* admin_area : 广东
* cnty : 中国
* lat : 22.5410099
* lon : 114.05095673
* tz : +8.00
*/
private String cid;
private String location;
private String parent_city;
private String admin_area;
private String cnty;
private String lat;
private String lon;
private String tz;
public String getCid() {
return cid;
}
public void setCid(String cid) {
this.cid = cid;
}
public String getLocation() {
return location;
}
public void setLocation(String location) {
this.location = location;
}
public String getParent_city() {
return parent_city;
}
public void setParent_city(String parent_city) {
this.parent_city = parent_city;
}
public String getAdmin_area() {
return admin_area;
}
public void setAdmin_area(String admin_area) {
this.admin_area = admin_area;
}
public String getCnty() {
return cnty;
}
public void setCnty(String cnty) {
this.cnty = cnty;
}
public String getLat() {
return lat;
}
public void setLat(String lat) {
this.lat = lat;
}
public String getLon() {
return lon;
}
public void setLon(String lon) {
this.lon = lon;
}
public String getTz() {
return tz;
}
public void setTz(String tz) {
this.tz = tz;
}
}
public static class UpdateBean {
/**
* loc : 2019-11-19 19:57
* utc : 2019-11-19 11:57
*/
private String loc;
private String utc;
public String getLoc() {
return loc;
}
public void setLoc(String loc) {
this.loc = loc;
}
public String getUtc() {
return utc;
}
public void setUtc(String utc) {
this.utc = utc;
}
}
public static class DailyForecastBean {
/**
* cond_code_d : 100
* cond_code_n : 101
* cond_txt_d : 晴
* cond_txt_n : 多云
* date : 2019-11-19
* hum : 50
* mr : 23:52
* ms : 12:27
* pcpn : 0.0
* pop : 20
* pres : 1012
* sr : 06:39
* ss : 17:38
* tmp_max : 22
* tmp_min : 16
* uv_index : 5
* vis : 25
* wind_deg : 31
* wind_dir : 东北风
* wind_sc : 3-4
* wind_spd : 17
*/
private String cond_code_d;
private String cond_code_n;
private String cond_txt_d;
private String cond_txt_n;
private String date;
private String hum;
private String mr;
private String ms;
private String pcpn;
private String pop;
private String pres;
private String sr;
private String ss;
private String tmp_max;
private String tmp_min;
private String uv_index;
private String vis;
private String wind_deg;
private String wind_dir;
private String wind_sc;
private String wind_spd;
public String getCond_code_d() {
return cond_code_d;
}
public void setCond_code_d(String cond_code_d) {
this.cond_code_d = cond_code_d;
}
public String getCond_code_n() {
return cond_code_n;
}
public void setCond_code_n(String cond_code_n) {
this.cond_code_n = cond_code_n;
}
public String getCond_txt_d() {
return cond_txt_d;
}
public void setCond_txt_d(String cond_txt_d) {
this.cond_txt_d = cond_txt_d;
}
public String getCond_txt_n() {
return cond_txt_n;
}
public void setCond_txt_n(String cond_txt_n) {
this.cond_txt_n = cond_txt_n;
}
public String getDate() {
return date;
}
public void setDate(String date) {
this.date = date;
}
public String getHum() {
return hum;
}
public void setHum(String hum) {
this.hum = hum;
}
public String getMr() {
return mr;
}
public void setMr(String mr) {
this.mr = mr;
}
public String getMs() {
return ms;
}
public void setMs(String ms) {
this.ms = ms;
}
public String getPcpn() {
return pcpn;
}
public void setPcpn(String pcpn) {
this.pcpn = pcpn;
}
public String getPop() {
return pop;
}
public void setPop(String pop) {
this.pop = pop;
}
public String getPres() {
return pres;
}
public void setPres(String pres) {
this.pres = pres;
}
public String getSr() {
return sr;
}
public void setSr(String sr) {
this.sr = sr;
}
public String getSs() {
return ss;
}
public void setSs(String ss) {
this.ss = ss;
}
public String getTmp_max() {
return tmp_max;
}
public void setTmp_max(String tmp_max) {
this.tmp_max = tmp_max;
}
public String getTmp_min() {
return tmp_min;
}
public void setTmp_min(String tmp_min) {
this.tmp_min = tmp_min;
}
public String getUv_index() {
return uv_index;
}
public void setUv_index(String uv_index) {
this.uv_index = uv_index;
}
public String getVis() {
return vis;
}
public void setVis(String vis) {
this.vis = vis;
}
public String getWind_deg() {
return wind_deg;
}
public void setWind_deg(String wind_deg) {
this.wind_deg = wind_deg;
}
public String getWind_dir() {
return wind_dir;
}
public void setWind_dir(String wind_dir) {
this.wind_dir = wind_dir;
}
public String getWind_sc() {
return wind_sc;
}
public void setWind_sc(String wind_sc) {
this.wind_sc = wind_sc;
}
public String getWind_spd() {
return wind_spd;
}
public void setWind_spd(String wind_spd) {
this.wind_spd = wind_spd;
}
}
}
}
接下来在ApiService中添加
 代码如下: 代码如下:
/**
* 未来3 - 7天天气预报
*/
@GET("/s6/weather/forecast?key=3086e91d66c04ce588a7f538f917c7f4")
Call getWeatherForecast(@Query("location") String location);
② 修改订阅器
接下来修改订阅器WeatherContract
  WeatherContract代码如下: WeatherContract代码如下:
package com.llw.goodweather.contract;
import android.content.Context;
import com.llw.goodweather.api.ApiService;
import com.llw.goodweather.bean.TodayResponse;
import com.llw.goodweather.bean.WeatherForecastResponse;
import com.llw.mvplibrary.base.BasePresenter;
import com.llw.mvplibrary.base.BaseView;
import com.llw.mvplibrary.net.NetCallBack;
import com.llw.mvplibrary.net.ServiceGenerator;
import retrofit2.Call;
import retrofit2.Response;
/**
* 天气订阅器
*/
public class WeatherContract {
public static class WeatherPresenter extends BasePresenter {
/**
* 当日天气
* @param context
* @param location 区/县
*/
public void todayWeather(final Context context, String location) {
//得到构建之后的网络请求服务,这里的地址已经拼接完成,只差一个location了
ApiService service = ServiceGenerator.createService(ApiService.class);
//设置请求回调 NetCallBack是重写请求回调
service.getTodayWeather(location).enqueue(new NetCallBack() {
//成功回调
@Override
public void onSuccess(Call call, Response response) {
if (getView() != null) {//当视图不会空时返回请求数据
getView().getTodayWeatherResult(response);
}
}
//失败回调
@Override
public void onFailed() {
if (getView() != null) {//当视图不会空时获取错误信息
getView().getDataFailed();
}
}
});
}
/**
* 天气预报 3-7天(白嫖的就只能看到3天)
* @param context
* @param location
*/
public void weatherForecast(final Context context,String location){
ApiService service = ServiceGenerator.createService(ApiService.class);
service.getWeatherForecast(location).enqueue(new NetCallBack() {
@Override
public void onSuccess(Call call, Response response) {
if(getView() != null){
getView().getWeatherForecastResult(response);
}
}
@Override
public void onFailed() {
if(getView() != null){
getView().getDataFailed();
}
}
});
}
}
public interface IWeatherView extends BaseView {
//查询当天天气的数据返回
void getTodayWeatherResult(Response response);
//查询天气预报的数据返回
void getWeatherForecastResult(Response response);
//错误返回
void getDataFailed();
}
}
接下来修改布局,增加列表和适配器
③ 修改布局,增加列表和适配器
 代码中 代码中  这个时候你的MainActivity.java会报错 这个时候你的MainActivity.java会报错  这是因为订阅器里面的内容没有写入。鼠标点击,Alt + Enter 这是因为订阅器里面的内容没有写入。鼠标点击,Alt + Enter  
 接下来创建列表的item 在layout目录下创建item_weather_forecast_list.xml文件 接下来创建列表的item 在layout目录下创建item_weather_forecast_list.xml文件
 代码如下: 代码如下:
接下来创建一个适配器 在com.llw.goodweather下新建一个WeatherForecastAdapter适配器  代码如下: 代码如下:
package com.llw.goodweather.adapter;
import androidx.annotation.Nullable;
import com.chad.library.adapter.base.BaseQuickAdapter;
import com.chad.library.adapter.base.BaseViewHolder;
import com.llw.goodweather.R;
import com.llw.goodweather.bean.WeatherForecastResponse;
import java.util.List;
/**
* 天气预报列表展示适配器
*/
public class WeatherForecastAdapter extends BaseQuickAdapter {
public WeatherForecastAdapter(int layoutResId, @Nullable List data) {
super(layoutResId, data);
}
@Override
protected void convert(BaseViewHolder helper, WeatherForecastResponse.HeWeather6Bean.DailyForecastBean item) {
helper.setText(R.id.tv_date, item.getDate())//日期
.setText(R.id.tv_info, item.getCond_txt_d())//天气
.setText(R.id.tv_low_and_height, item.getTmp_min() + "/" + item.getTmp_max() + "℃");//最低温和最高温
}
}
④ 使用适配器进行数据展示
在MainActivity.java中增加
List mList;//初始化数据源
WeatherForecastAdapter mAdapter;//初始化适配器
/**
* 初始化天气预报数据列表
*/
private void initList() {
mList = new ArrayList();//声明为ArrayList
mAdapter = new WeatherForecastAdapter(R.layout.item_weather_forecast_list, mList);//为适配器设置布局和数据源
LinearLayoutManager manager = new LinearLayoutManager(context);//布局管理,默认是纵向
rv.setLayoutManager(manager);//为列表配置管理器
rv.setAdapter(mAdapter);//为列表配置适配器
}
然后在**initData()**方法中调用  
返回值做处理
//查询天气预报,请求成功后的数据返回
@Override
public void getWeatherForecastResult(Response response) {
if (("ok").equals(response.body().getHeWeather6().get(0).getStatus())) {
//最低温和最高温
tvLowHeight.setText(response.body().getHeWeather6().get(0).getDaily_forecast().get(0).getTmp_min() + " / " +
response.body().getHeWeather6().get(0).getDaily_forecast().get(0).getTmp_max() + "℃");
if (response.body().getHeWeather6().get(0).getDaily_forecast() != null) {
List data
= response.body().getHeWeather6().get(0).getDaily_forecast();
mList.clear();//添加数据之前先清除
mList.addAll(data);//添加数据
mAdapter.notifyDataSetChanged();//刷新列表
} else {
ToastUtils.showShortToast(context, "天气预报数据为空");
}
} else {
ToastUtils.showShortToast(context, response.body().getHeWeather6().get(0).getStatus());
}
}
运行  这样天气预报这个功能就完成了。 接下来是生活指数。 这样天气预报这个功能就完成了。 接下来是生活指数。
7. 生活指数
生活指数就是一些生活建议,实现的不走其实和天气预报差不太多,但是比天气预报要简单一些,因为不需要列表显示,文本即可。
① 新增API接口
根据和风天气中的文档,得知生活指数接口为:
https://free-api.heweather.net/s6/weather/lifestyle?key=3086e91d66c04ce588a7f538f917c7f4&location=福田区
在网页上访问得到返回值,生成一个实体  代码如下: 代码如下:
package com.llw.goodweather.bean;
import java.util.List;
public class LifeStyleResponse {
private List HeWeather6;
public List getHeWeather6() {
return HeWeather6;
}
public void setHeWeather6(List HeWeather6) {
this.HeWeather6 = HeWeather6;
}
public static class HeWeather6Bean {
/**
* basic : {"cid":"CN101280603","location":"福田","parent_city":"深圳","admin_area":"广东","cnty":"中国","lat":"22.5410099","lon":"114.05095673","tz":"+8.00"}
* update : {"loc":"2019-11-23 09:55","utc":"2019-11-23 01:55"}
* status : ok
* lifestyle : [{"type":"comf","brf":"舒适","txt":"白天不太热也不太冷,风力不大,相信您在这样的天气条件下,应会感到比较清爽和舒适。"},{"type":"drsg","brf":"热","txt":"天气热,建议着短裙、短裤、短薄外套、T恤等夏季服装。"},{"type":"flu","brf":"少发","txt":"各项气象条件适宜,无明显降温过程,发生感冒机率较低。"},{"type":"sport","brf":"适宜","txt":"天气较好,赶快投身大自然参与户外运动,尽情感受运动的快乐吧。"},{"type":"trav","brf":"适宜","txt":"天气较好,温度适宜,是个好天气哦。这样的天气适宜旅游,您可以尽情地享受大自然的风光。"},{"type":"uv","brf":"强","txt":"紫外线辐射强,建议涂擦SPF20左右、PA++的防晒护肤品。避免在10点至14点暴露于日光下。"},{"type":"cw","brf":"适宜","txt":"适宜洗车,未来持续两天无雨天气较好,适合擦洗汽车,蓝天白云、风和日丽将伴您的车子连日洁净。"},{"type":"air","brf":"中","txt":"气象条件对空气污染物稀释、扩散和清除无明显影响。"}]
*/
private BasicBean basic;
private UpdateBean update;
private String status;
private List lifestyle;
public BasicBean getBasic() {
return basic;
}
public void setBasic(BasicBean basic) {
this.basic = basic;
}
public UpdateBean getUpdate() {
return update;
}
public void setUpdate(UpdateBean update) {
this.update = update;
}
public String getStatus() {
return status;
}
public void setStatus(String status) {
this.status = status;
}
public List getLifestyle() {
return lifestyle;
}
public void setLifestyle(List lifestyle) {
this.lifestyle = lifestyle;
}
public static class BasicBean {
/**
* cid : CN101280603
* location : 福田
* parent_city : 深圳
* admin_area : 广东
* cnty : 中国
* lat : 22.5410099
* lon : 114.05095673
* tz : +8.00
*/
private String cid;
private String location;
private String parent_city;
private String admin_area;
private String cnty;
private String lat;
private String lon;
private String tz;
public String getCid() {
return cid;
}
public void setCid(String cid) {
this.cid = cid;
}
public String getLocation() {
return location;
}
public void setLocation(String location) {
this.location = location;
}
public String getParent_city() {
return parent_city;
}
public void setParent_city(String parent_city) {
this.parent_city = parent_city;
}
public String getAdmin_area() {
return admin_area;
}
public void setAdmin_area(String admin_area) {
this.admin_area = admin_area;
}
public String getCnty() {
return cnty;
}
public void setCnty(String cnty) {
this.cnty = cnty;
}
public String getLat() {
return lat;
}
public void setLat(String lat) {
this.lat = lat;
}
public String getLon() {
return lon;
}
public void setLon(String lon) {
this.lon = lon;
}
public String getTz() {
return tz;
}
public void setTz(String tz) {
this.tz = tz;
}
}
public static class UpdateBean {
/**
* loc : 2019-11-23 09:55
* utc : 2019-11-23 01:55
*/
private String loc;
private String utc;
public String getLoc() {
return loc;
}
public void setLoc(String loc) {
this.loc = loc;
}
public String getUtc() {
return utc;
}
public void setUtc(String utc) {
this.utc = utc;
}
}
public static class LifestyleBean {
/**
* type : comf
* brf : 舒适
* txt : 白天不太热也不太冷,风力不大,相信您在这样的天气条件下,应会感到比较清爽和舒适。
*/
private String type;
private String brf;
private String txt;
public String getType() {
return type;
}
public void setType(String type) {
this.type = type;
}
public String getBrf() {
return brf;
}
public void setBrf(String brf) {
this.brf = brf;
}
public String getTxt() {
return txt;
}
public void setTxt(String txt) {
this.txt = txt;
}
}
}
}
在ApiService中增加  代码如下: 代码如下:
/**
* 生活指数
*/
@GET("/s6/weather/lifestyle?key=3086e91d66c04ce588a7f538f917c7f4")
Call getLifestyle(@Query("location") String location);
记得将key的值修改为自己的Key
② 修改订阅器
在WeatherContract新增生活指数订阅  
/**
* 生活指数
* @param context
* @param location
*/
public void lifeStyle(final Context context,String location){
ApiService service = ServiceGenerator.createService(ApiService.class);
service.getLifestyle(location).enqueue(new NetCallBack() {
@Override
public void onSuccess(Call call, Response response) {
if(getView() != null){
getView().getLifeStyleResult(response);
}
}
@Override
public void onFailed() {
if(getView() != null){
getView().getDataFailed();
}
}
});
}
//查询生活指数的数据返回
void getLifeStyleResult(Response response);
③ 修改布局
这次要展示的数据会比较多,所以布局的整体要用NestedScrollView包裹起来,变成一个·可以上下滑动的布局,布局修改后的代码如下(PS:为了不出现问题,这里我贴上全部的布局代码):
注释已经在代码中写好了,相信你看了就明白了。接下来就是数据返回的处理,和页面数据渲染显示。
④ 数据渲染显示
 由于返回的数据可能会为空,为了使返回数据为空的时候程序不报错,这里要做判断,在模块的utils包下写一个工具类。 由于返回的数据可能会为空,为了使返回数据为空的时候程序不报错,这里要做判断,在模块的utils包下写一个工具类。  工具类代码如下: 工具类代码如下:
package com.llw.mvplibrary.utils;
import android.os.Build;
import android.util.SparseArray;
import android.util.SparseBooleanArray;
import android.util.SparseIntArray;
import android.util.SparseLongArray;
import androidx.annotation.RequiresApi;
import androidx.collection.LongSparseArray;
import androidx.collection.SimpleArrayMap;
import java.lang.reflect.Array;
import java.util.Collection;
import java.util.Map;
/**
* 空判断工具类
*/
public final class ObjectUtils {
private ObjectUtils() {
throw new UnsupportedOperationException("u can't instantiate me...");
}
/**
* Return whether object is empty.
*
* @param obj The object.
* @return {@code true}: yes{@code false}: no
*/
public static boolean isEmpty(final Object obj) {
if (obj == null) {
return true;
}
if (obj.getClass().isArray() && Array.getLength(obj) == 0) {
return true;
}
if (obj instanceof CharSequence && obj.toString().length() == 0) {
return true;
}
if (obj instanceof Collection && ((Collection) obj).isEmpty()) {
return true;
}
if (obj instanceof Map && ((Map) obj).isEmpty()) {
return true;
}
if (obj instanceof SimpleArrayMap && ((SimpleArrayMap) obj).isEmpty()) {
return true;
}
if (obj instanceof SparseArray && ((SparseArray) obj).size() == 0) {
return true;
}
if (obj instanceof SparseBooleanArray && ((SparseBooleanArray) obj).size() == 0) {
return true;
}
if (obj instanceof SparseIntArray && ((SparseIntArray) obj).size() == 0) {
return true;
}
if (Build.VERSION.SDK_INT >= Build.VERSION_CODES.JELLY_BEAN_MR2) {
if (obj instanceof SparseLongArray && ((SparseLongArray) obj).size() == 0) {
return true;
}
}
if (obj instanceof LongSparseArray && ((LongSparseArray) obj).size() == 0) {
return true;
}
if (Build.VERSION.SDK_INT >= Build.VERSION_CODES.JELLY_BEAN) {
if (obj instanceof android.util.LongSparseArray
&& ((android.util.LongSparseArray) obj).size() == 0) {
return true;
}
}
return false;
}
public static boolean isEmpty(final CharSequence obj) {
return obj == null || obj.toString().length() == 0;
}
public static boolean isEmpty(final Collection obj) {
return obj == null || obj.isEmpty();
}
public static boolean isEmpty(final Map obj) {
return obj == null || obj.isEmpty();
}
public static boolean isEmpty(final SimpleArrayMap obj) {
return obj == null || obj.isEmpty();
}
public static boolean isEmpty(final SparseArray obj) {
return obj == null || obj.size() == 0;
}
public static boolean isEmpty(final SparseBooleanArray obj) {
return obj == null || obj.size() == 0;
}
public static boolean isEmpty(final SparseIntArray obj) {
return obj == null || obj.size() == 0;
}
public static boolean isEmpty(final LongSparseArray obj) {
return obj == null || obj.size() == 0;
}
@RequiresApi(api = Build.VERSION_CODES.JELLY_BEAN_MR2)
public static boolean isEmpty(final SparseLongArray obj) {
return obj == null || obj.size() == 0;
}
@RequiresApi(api = Build.VERSION_CODES.JELLY_BEAN)
public static boolean isEmpty(final android.util.LongSparseArray obj) {
return obj == null || obj.size() == 0;
}
/**
* Return whether object is not empty.
*
* @param obj The object.
* @return {@code true}: yes{@code false}: no
*/
public static boolean isNotEmpty(final Object obj) {
return !isEmpty(obj);
}
public static boolean isNotEmpty(final CharSequence obj) {
return !isEmpty(obj);
}
public static boolean isNotEmpty(final Collection obj) {
return !isEmpty(obj);
}
public static boolean isNotEmpty(final Map obj) {
return !isEmpty(obj);
}
public static boolean isNotEmpty(final SimpleArrayMap obj) {
return !isEmpty(obj);
}
public static boolean isNotEmpty(final SparseArray obj) {
return !isEmpty(obj);
}
public static boolean isNotEmpty(final SparseBooleanArray obj) {
return !isEmpty(obj);
}
public static boolean isNotEmpty(final SparseIntArray obj) {
return !isEmpty(obj);
}
public static boolean isNotEmpty(final LongSparseArray obj) {
return !isEmpty(obj);
}
@RequiresApi(api = Build.VERSION_CODES.JELLY_BEAN_MR2)
public static boolean isNotEmpty(final SparseLongArray obj) {
return !isEmpty(obj);
}
@RequiresApi(api = Build.VERSION_CODES.JELLY_BEAN)
public static boolean isNotEmpty(final android.util.LongSparseArray obj) {
return !isEmpty(obj);
}
/**
* Return whether object1 is equals to object2.
*
* @param o1 The first object.
* @param o2 The second object.
* @return {@code true}: yes{@code false}: no
*/
public static boolean equals(final Object o1, final Object o2) {
return o1 == o2 || (o1 != null && o1.equals(o2));
}
/**
* Require the objects are not null.
*
* @param objects The object.
* @throws NullPointerException if any object is null in objects
*/
public static void requireNonNull(final Object... objects) {
if (objects == null) throw new NullPointerException();
for (Object object : objects) {
if (object == null) throw new NullPointerException();
}
}
/**
* Return the nonnull object or default object.
*
* @param object The object.
* @param defaultObject The default object to use with the object is null.
* @param The value type.
* @return the nonnull object or default object
*/
public static T getOrDefault(final T object, final T defaultObject) {
if (object == null) {
return defaultObject;
}
return object;
}
/**
* Return the hash code of object.
*
* @param o The object.
* @return the hash code of object
*/
public static int hashCode(final Object o) {
return o != null ? o.hashCode() : 0;
}
}
接下来调用方法请求生活指数 
请求返回数据做处理:
//查询生活指数,请求成功后的数据返回
@Override
public void getLifeStyleResult(Response response) {
if(("ok").equals(response.body().getHeWeather6().get(0).getStatus())){
List data = response.body().getHeWeather6().get(0).getLifestyle();
if(!ObjectUtils.isEmpty(data)){
for (int i = 0;i
tvComf.setText("舒适度:"+data.get(i).getTxt());
}else if(("drsg").equals(data.get(i).getType())){
tvDrsg.setText("穿衣指数:"+data.get(i).getTxt());
}else if(("flu").equals(data.get(i).getType())){
tvFlu.setText("感冒指数:"+data.get(i).getTxt());
}else if(("sport").equals(data.get(i).getType())){
tvSport.setText("运动指数:"+data.get(i).getTxt());
}else if(("trav").equals(data.get(i).getType())){
tvTrav.setText("旅游指数:"+data.get(i).getTxt());
}else if(("cw").equals(data.get(i).getType())){
tvCw.setText("洗车指数:"+data.get(i).getTxt());
}else if(("air").equals(data.get(i).getType())){
tvAir.setText("空气指数:"+data.get(i).getTxt());
}
}
}else {
ToastUtils.showShortToast(context, "生活指数数据为空");
}
}else {
ToastUtils.showShortToast(context, response.body().getHeWeather6().get(0).getStatus());
}
}
运行一下:  很明显数据显示不完全,然后向上滑动。 很明显数据显示不完全,然后向上滑动。 
这样就完成了这个生活指数的数据显示。 但是感觉页面上好多字呀,这时候为了在视觉上舒缓,就要通过会动的东西来勾引,呸,吸引住你。比如风的数据显示,多少级的风,哪个方向,通过风车来增加页面的动。会动的风车喔。
源码地址:GoodWeather 欢迎 Star 和 Fork
下一篇:Android 天气APP(六)旋转风车显示风力、风向
|